Hey there everyone, Brenda here! Sorry for my lack of posts lately I got my wisdom teeth out and swelled up like a watermelon and now I'm breaking out like MAD T_T It's a tough life. Anyways I'm trying to get rid of some of my stuff to make room for my MAC addiction (As well as get a little money to support it LOL) If you're interested head over to:
Seraphics selling thread on Temptalia!
There are lots of high end brands up for grabs like Dior, Lancome, and such so go check it out ;)
I honestly don't want to sell on this blog as there is no feedback for it or anything so if you're interested tell me there.
Monday, December 29, 2008
Tuesday, December 23, 2008
MAC Dame Edna and Lash & Dash
Hey guys!
Here for a quick update!
The 2 collections Dame Edna and Lash & Dash from MAC are now available online!!!
They will be in stores on the 26th of December (or boxing day for us Canadians!).
Click the links below to check them out~
Dame Edna
Lash & Dash
Hmmm.. I'm not much into the lashes but I will definitely check out those lipglasses!!!
Stay beautiful everyone and Merry Christmas!!!!!
Much Joy!
-Christina
Wednesday, December 17, 2008
FOTD: Grreeeeen!!!
Hellooooo~
I just wanted to update with a quick FOTD!
I'm actually using colors weeee~ On a daily basis, I usually use browns/neutrals so this is odd for me to wear colors...
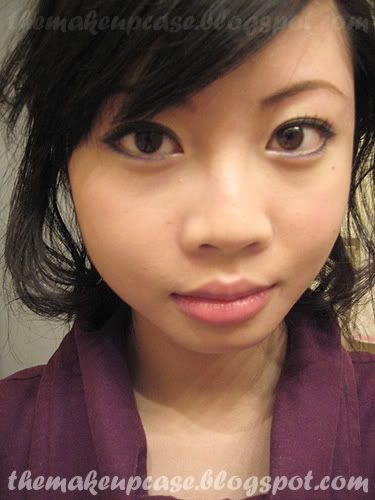
Forgive the pictures, I honestly can't take a good photo worth my life AND the lighting was horrible haha Sigh.. don't you love the reflection of blue light from my laptop that has shone on my face? sorry about that guys!!
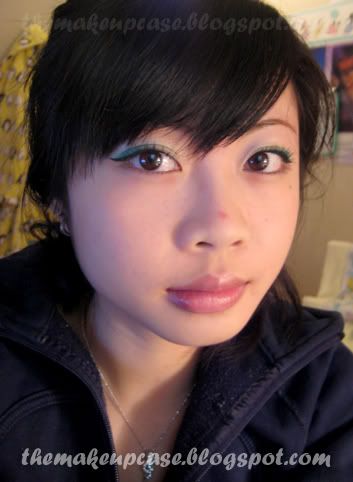 Excuse the gross thing on my nose, I was being bad and decided to squeeze a pimple... bad idea!
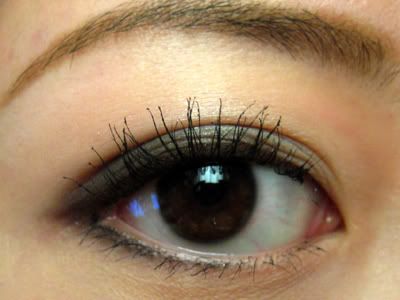
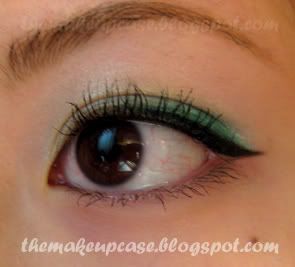 Close-up of the eye
Eyes: Too Faced Shadow Insurance, Maybelline Define-a-brow (Medium Brown), MAC Tempting Eyes Quad (Next to Nothing), FASIO Hyper-stay Mascara Shock Free Curl Volume (001 Black), Clinique Lash Power Mascara (Black Onyx), Anastasia Brow Gel (Clear), GOSH Velvet Touch Eyeliner Pencil (Black Ink), GOSH Liquid Eyeliner (Black), Shiseido Hydro Power Eyeshadow (H13 Clover Dew), Anna Sui Eye Color Accent (900), Innocence Mineral Cosmetics Eyeshadow (True Green)
Face: MAC Select Moisturecover Concealer (NC20), Smashbox Color Correcting Primer (Green), Boots No7 Mattifying Make-up Base, Hourglass Mineral Oxygen Powder Foundation (No. 2), Chanel Poudre Universelle Compact (30)
Lips: Biotherm Nutrisource Levres Lip Balm, MAC Lipstick (Viva Glam V)
Will do How-To if requested!!! I have to go to work now~ Have a good day everyone!
The weather outside is honestly FRIGHTFUL!!
TOO MUCH SNOWWW~ Stay safe!!
Much <3
-Christina
I just wanted to update with a quick FOTD!
I'm actually using colors weeee~ On a daily basis, I usually use browns/neutrals so this is odd for me to wear colors...
Forgive the pictures, I honestly can't take a good photo worth my life AND the lighting was horrible haha Sigh.. don't you love the reflection of blue light from my laptop that has shone on my face? sorry about that guys!!
Excuse the gross thing on my nose, I was being bad and decided to squeeze a pimple... bad idea!Close-up of the eyeEyes: Too Faced Shadow Insurance, Maybelline Define-a-brow (Medium Brown), MAC Tempting Eyes Quad (Next to Nothing), FASIO Hyper-stay Mascara Shock Free Curl Volume (001 Black), Clinique Lash Power Mascara (Black Onyx), Anastasia Brow Gel (Clear), GOSH Velvet Touch Eyeliner Pencil (Black Ink), GOSH Liquid Eyeliner (Black), Shiseido Hydro Power Eyeshadow (H13 Clover Dew), Anna Sui Eye Color Accent (900), Innocence Mineral Cosmetics Eyeshadow (True Green)
Face: MAC Select Moisturecover Concealer (NC20), Smashbox Color Correcting Primer (Green), Boots No7 Mattifying Make-up Base, Hourglass Mineral Oxygen Powder Foundation (No. 2), Chanel Poudre Universelle Compact (30)
Lips: Biotherm Nutrisource Levres Lip Balm, MAC Lipstick (Viva Glam V)
Will do How-To if requested!!! I have to go to work now~ Have a good day everyone!
The weather outside is honestly FRIGHTFUL!!
TOO MUCH SNOWWW~ Stay safe!!
Much <3
-Christina
Tuesday, December 16, 2008
25% Off MAC Holiday!
Hey guys!!
Quick update today~
Just to let everyone know, a lot of MAC holiday collections are ON SALE!
YES, ON SALE! I have confirmed that this sale is going on IN STORE as well!
It is 25% off on the following collections (click the links below to go to the site):
Passions of Red
Adoring Carmine
MAC Exclusives
Little Darlings
Run to your local MAC counter or freestanding store quick!!! A lot of them are sold out, but if you do your research, many places (ESPECIALLY COUNTERS AT THE BAY) have MANY left!!
GOGOGOGOGO!
Also, for those who are waiting for this collection,
the MAC Chill Collection is now up for sale on the website!!!!
Weee!! Penultimate liner here I come!!
For those who are waiting for this to come in store, it will be available on December 18th.
Check it out HERE.
That is all for today, happy shopping!!
Much <3
-Christina
Saturday, December 6, 2008
Pre-Birthday FOTD! Smokey eye~
Hellooo to you all~
It's been a while since I've posted.. I do apologize =(
I've had so much to do for school these past few weeks.. and yesterday was the last day for lectures!!!!!!!! Yessssss.......!
I have exams next week, but I can't think about them yet because.......
TOMORROW IS MY BIRTHDAY!!!!!
=D
I'm celebrating it today with a few friends (Since many have exams on the Monday)
My beautiful Brenda is not here to join me due to exams, but I send luck and my love to her =D
So.. Today.. I just wanted to do a quick post on my look today (although it's not too exciting..)
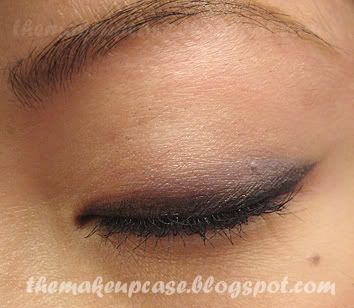
I did a quick, simple smokey eye for today.

Forgive me as I am in my beloved penguin robe and my hair not "did" yet =P =D haha! It's a tad cold in my house at the moment...
Close up time (ugh... close ups are evil!)
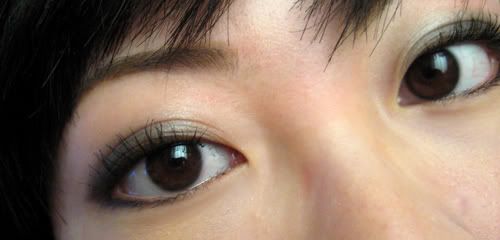
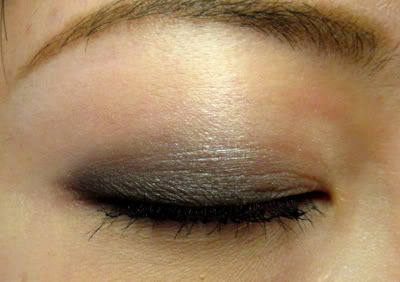
Eyes: Too Faced Shadow Insurance, Maybelline Define-a-brow (Medium Brown), MAC Tempting Eyes Quad (Next to Nothing), FASIO Hyper-stay Mascara Shock Free Curl Volume (001 Black), Clinique Lash Power Mascara (Black Onyx), Anastasia Brow Gel (Clear), MAC Suite Array Eyeshadow Duo (Smoke & Ash), Chanel Ombre Essentielle Soft Touch Eyeshadow (69 Black Star), GOSH Velvet Touch Eyeliner Pencil (Black Ink)
Face: MAC Select Moisturecover Concealer (NC20), Physician's Formula Mineral Wear Talc-free Pressed Power (Translucent), Lise Watier Concealer Portfolio, Boots No7 Mattifying Make-up Base
Lips: Biotherm Nutrisource Levres Lip Balm, Dior Lip Maximizer
I do not have a time for a quick overview of a "How-To" for this look, but if you are wondering how feel free to request!! I will post one ASAP =D
Now.. off to buy groceries! Have a beautiful day everyone~
Much <3
-Christina
It's been a while since I've posted.. I do apologize =(
I've had so much to do for school these past few weeks.. and yesterday was the last day for lectures!!!!!!!! Yessssss.......!
I have exams next week, but I can't think about them yet because.......
TOMORROW IS MY BIRTHDAY!!!!!
=D
I'm celebrating it today with a few friends (Since many have exams on the Monday)
My beautiful Brenda is not here to join me due to exams, but I send luck and my love to her =D
So.. Today.. I just wanted to do a quick post on my look today (although it's not too exciting..)
I did a quick, simple smokey eye for today.
Forgive me as I am in my beloved penguin robe and my hair not "did" yet =P =D haha! It's a tad cold in my house at the moment...
Close up time (ugh... close ups are evil!)
Eyes: Too Faced Shadow Insurance, Maybelline Define-a-brow (Medium Brown), MAC Tempting Eyes Quad (Next to Nothing), FASIO Hyper-stay Mascara Shock Free Curl Volume (001 Black), Clinique Lash Power Mascara (Black Onyx), Anastasia Brow Gel (Clear), MAC Suite Array Eyeshadow Duo (Smoke & Ash), Chanel Ombre Essentielle Soft Touch Eyeshadow (69 Black Star), GOSH Velvet Touch Eyeliner Pencil (Black Ink)
Face: MAC Select Moisturecover Concealer (NC20), Physician's Formula Mineral Wear Talc-free Pressed Power (Translucent), Lise Watier Concealer Portfolio, Boots No7 Mattifying Make-up Base
Lips: Biotherm Nutrisource Levres Lip Balm, Dior Lip Maximizer
I do not have a time for a quick overview of a "How-To" for this look, but if you are wondering how feel free to request!! I will post one ASAP =D
Now.. off to buy groceries! Have a beautiful day everyone~
Much <3
-Christina
Wednesday, December 3, 2008
Where we'll be for the next 2-3 weeks
Okay so it's finals and I feel I have to give you guys a heads up because we will probably not be posting anytime soon as it's serious cramming time (Oh Spanish, why do I not understand thee?). Anyways as we will not be posting I decided to give you a few video tutorials with pretty looks
Red and Gold Holiday look! (I'll probably be using this look for a Christmas party)
Yellow and Black dramatic look (I love this girl! She is so unique and creative!)
Red and Green Holiday look! (Simple but cute, I like.)
Alright, I'm off to get my Philosophy paper done before I do some Spanish so have a nice night everyone!
Saturday, November 29, 2008
FOTD: Satellite Dreams and... Chrome yellow?!

Hello hello m'dears how are you this pleasant Saturday afternoon? Alright so I was playing makeup today (big surprise that is) so I decided to do a FOTD (Finally right?!) and this is a look I wore awhile ago but did today just for you, you may notice it's a little uneven and I have a perfect excuse for that, my have been a little wonky for the past few days so the crease isn't were it normally is (Plus I have an extra crease on both eyes O_O). I hope it isn't THAT noticeable, but I like this look because the colours aren't what people normally expect and you can always replace the yellow with a gold colour (MAC Gorgeous Gold E/S) or the purple with a teal colour (MAC Electric Eel E/S)

Eyes: UDPP, MAC Satellite Dreams E/S, MAC Chrome yellow E/S (If you find this too intense go for Gorgeous Gold E/S) , Diorshow Iconic
Cheeks: MAC Pinch me blush
Lips: MAC Freckletone L/S, MAC Pink Lemonade L/G
Eyes: Alright plain and simple UDPP and then Chrome yellow on the inner lid don't go past it or you'll have some ugly colour between your purple and yellow. Satellite dreams for the rest (Up to the crease only), blend a little bit between the two and following the top lid do the same on the lower lid, then add mascara and you're done for the eyes. Easy, no?
Cheeks: Add pinch me blush
Lips: I covered my lips with concealer first since it was stained from the red lipstick I was wearing, added Freckletone over top and then added Pink Lemonade using a lipbrush.
And you're done! Fast and easy.

And look Teal (MAC Cool Heat LE E/S) and Hot pink (MAC Girl about town L/S + Dior highshine addict Nude Silhouette L/S!)
Anyways how is everyone doing, your weekend going well so far? How was your Black Friday (US)? Personally I can't wait til Boxing day (CAD) I'm going to CHARGE IT!
-Brenda
(DEC 19th EDIT: Alright so look what I found! I was just blog surfing and I found this look which was posted 2 days before I posted, I like hers a little better though lol. LINK )
Wednesday, November 26, 2008
Getting the most bang out of your buck
Alright we all know that the economy is bad at the moment and Christmas is around the corner s we want to save as much as we can, personally I should follow my own advice as I'm a HUGE makeup junkie (trying to save for a major brush, hello kitty, and MAC pro haul though). Along my addiction I learned that there are a few things that we can do to save, every little bit counts....really.
Mascaras: Alright we all know that there are bacteria and stuff unless you use disposable mascara wands or a mascara brush, but some people tend to complain about their mascaras drying out. Well one thing I also noticed is that many women tend to try to get more product on the brush by pumping it in and out of the bottle, and this traps air in the mascara causing it to dry out faster! Instead when you want more mascara SWIRL! this way you get your mascara on the brush, get product you wouldn't normally from pumping it, and it doesn't dry out as fast!
Colours: Alright, I have like 20 red lipsticks but to be honest does anyone really NEED that many? This applies to eye shadows and blushes as well! If you're looking for more shades try drugstore brands, they're cheaper, or just try mixing colours you have now! Like pinks with browns and you get a nice rose colour! Restrain yourself from buying dupes of colours you have, honestly you don't need it.
Multi-purpose: Alright we hear about multi-purpose makeup all the time now, but it cost more then just buying the separate pieces sometimes (ie: NARS the multiple) one lipstick could do everything they do, and maybe more! Viva Glam V doubles as a nice blush, and blush works on the eyes for a nice effect as well! Try to find more uses for your makeup, it helps you save yourself from buying ANOTHER blush.
Do your research: I can't stress this one enough, there have been multiple times I haven't checked ratings bought something and completely regretted it. The makeup alley is a good place to start (Google it, I'm a little lost on the web url right now)
Return what doesn't work: Okay I'm not to like returning but sometimes you have to do what you have to do. Here are a few little excuses for you if you're having a little trouble.
-Just be honest, places like MAC and Sephora are nice about returns.
- It caused an allergic reaction
- It irritated my skin/eyes/lips
- The smell is much to strong!
Make your own tinted moisturizer: tinted moisturizer is expensive! So just make you own, it's only a blend of moisturizer and liquid foundation!
BTW: Starbucks napkins, make great blotting papers!
Budget: Alright this one is common sense, can you really afford to buy it right now without giving up food, and other necessities of life? Should you buy it at all? Do you need it? Why do I want it? Will I feel guilty after wards? On an interesting note lipstick sales go up when the economy goes down. Alright so next time you do some shopping try to consider these things, and if that fails try to think about a poor little Ethiopian girl who doesn't even have food while you're staring at that eyeshadow.
-Brenda
Tuesday, November 25, 2008
Wearing the red lipstick
Alright, I'm sure many of us have been through some red troubles. Me personally, I took a long time to get my technique down so I am sharing with you:
1. Choosing your red: Depends on what you like really and what compliments your skin tone. BUT if you're a coffee drinker like me and have yellow teeth (Sigh, one day pearly whites I'll see you again) avoid yellow, coral, orange based reds they will only make the yellowness more noticeable! Instead choose pink and blue based reds.
2. You have to have smooth well exfoliated lips and moisturized (Especially if you're going matte!). To exfoliate try some olive oil and sugar, works and your lips taste yummy after wards (Or you can just go buy a LIP exfoliate). Now moisturize your lips with a chap stick (This entire process if easier if you moisturize your lips regularly, drink lots of water, and exfoliate about once a week)
3. Alright time to line, you can pick something either much darker then your desired lipstick, slightly darker, or colourless. I use colourless (benefit d'finer d'liner, Too faced borderline, Urban decay lip liner in clear), if you want to make your lips a little more plump looking line right outside the lip line, if you want more of your natural lip shape line on or a little below your lip line. You can either use a lip primer next or you can use your lip liner to fill in your lips.
4. Now your lips are all ready for your red, you have the choice of powdering now (I don't) because for some people it helps the lasting power. Apply the red lipstick (my favorite at the moment is MAC Lady Bug) either from the tube (which I ALWAYS DO) or using a lip brush, lip brush tends to tone down the colour no matter how many layers you put and from the tube is more intense and true to the colour you see in the tube. Avoid going out of the line because red does stain skin more noticeably but if you do don't fret, wipe it off and keep going I'll tell you how to fix it in a bit. Add setting powder on top to make it matte if you like.
5. Alright now your lips are looking smoking (Except maybe a stain or two) but even the best of us have a hard time getting that perfectly lined and even red lips we see in photographs. And here is the secret, CONCEALER! Take a concealer brush and line the outside of your smoking hot red lips with concealer and blend it outwards away from the lips but the lipline around the lips should be close to perfection (if it isn't perfect already). Keep your lipstick with you because red does tend to fade and you're set to go!
It's only Tuesday?! Oh god, this is going to be a long week... How are you holding up?
-Brenda
Monday, November 24, 2008
FOTD: Black liner
Who has the coolest caddy hat (with lace racing stripes!) in the land? I do!

Hiya ladies (And gentlemen)! How are you all today? Anyways it's been awhile I know but please bear with us, it's finals in about 2 weeks and I still have exams and such in my classes. So today's face of the day is a look I find I get the most compliments from, it's fast and easy but it definitely gets noticed.This one is simple, but it takes a bit of practice. (Oh man I'm pale as a ghost and my blush still never shows up!)
Eyes: Bobbi Brown Gel Eyeliner in Black ink, 209 brush, Diorshow Blackout, Diorshow brow, Guerlain Kohl powder in black
Lips: Your drop dead gorgeous red gloss or lipstick =) (First photo is cult of cherry + russian red lipglasses, second is So Scarlet lipstick)
Cheeks: MAC breath of plum blush (Or any sheertone really)
Possible dupes:
Guerlain Kohl powder: MAC Technakohl in Graphblack
Bobbi Brown Gel Eyeliner: MAC Fluidline in Black Track
Eyes: This requires precision, using the 209 MAC brush I usually line the upper lash line first no flicks at the end no nothing that comes later. Then I line the lower lash line and following the lower lash line flick out the end and extend a little bit towards the tip of your eyebrows. For the inner corner follow the upper lash line (pick a point on the nose that seems reasonable and try to make both eyes point to that point) and connect to the lower lash line. Add kohl liner to waterline for that extra drama, gel your brows, add mascara and you're done! Easier said then done so keep some makeup remover close by!
Blush: Make those apples (Of your cheek of course) look delicious by dusting a bit of light blush on.
Lips: I will be doing a red lips tutorial or something a little later but for now all you need to know is, line and fill.

And there you have it!
Anyways, how has your week been so far? I hope pleasant with all the information of the gorgeous upcoming MAC releases! If you haven't heard I suggest you click these links PRONTO!
Monogram
Hello Kitty
Temptalia always has the latest info on new and upcoming releases so go check out her site if you haven't already!
Temptalia
-brendaaaaaa
Tuesday, November 18, 2008
FOTD: Green!
Oh I know it's been awhile and I deeply apologize for that, when we started this blog I promised myself I'd try hard to keep it a regular thing (And that is NOT happening right now). *Sigh* if only school wasn't so stressful... Anyways I haven't been doing any makeup lately so this is a look for awhile back of which I still remember the products used (YAY!) I feel like I'm kind of cheating but...really I need a break.
You'll notice I rarely to never take close up pictures of my eye, this is mainly due to my camera. I will when I get my Canon Rebel XSI (Oh why must you cost so damn much you gorgeous hunk of metal?!)

Haha you can totally see my messed up eyes that day (Lack of sleep) in this picture
Eyes: UDPP, MAC Swimming E/S, MAC Juxt E/S, MAC Danger Zone mineral trio E/S (Black only)*, MAC Goldmine E/S, MAC Nylon E/S, Diorshow Iconic
Lips: MAC prep +Prime lips, Benefit d'liner d'finer, MAC So Scarlet L/S*, Diorkiss Cherry blossom (D/C)L/G*
Cheeks: MAC Blooming blush*
Possible dupes:
*MAC Danger Zone Mineral trio (Black) = Black tied
*MAC So Scarlet = Dubonet (closest I can think of)
*DiorKiss Snow Cherry (D/C) L/G = Flusterrose Lustreglass
*Blooming =Dame
Okay this is going to be quick and easy, it's one of my fast but dramatic looks.
Eyes: Udpp all over lid. Using 239 apply Swimming e/s from the crease down, using same brush on inner lid apply a light amount of Goldmine e/s, middle lid apply Juxt e/s, and outer lid apply a LITTLE BIT of the black e/s, blend with 217 brush and apply Nylon from crease up and blend some more. Little bit of Juxt lining the outer lower lid, throw on a bit of mascara and you're done the eyes.
Cheeks: Blooming blush of course.
Lips: Prep +Prime lips, D'finer d'liner outlining the lips and DAB on So Scarlet lightly (If you go from tube like I do) apply a little bit of Diorkiss Snow Cherry on top and you're good to go.

Once again I'm so sorry about not posting More often, I really will try as I have a few ideas to work from I just need to get them down. Stay gorgeous!
-Brenda hungry, Brenda want food.
Sunday, November 16, 2008
FOTD: Simple Smokey Purple
Hello lovelies~
Christina here! I found out my midterm was suddenly moved to ..... *DUN DUN DUN* FRIDAY!
Weeeeeeeeeeeeee... I can finally take somewhat of a break!! ANNNDD I can finally post my first FOTD =D
Yessss!
So today, I was really bored and whipped out my purple liquid eye shadow from Anna Sui..
It's a gorgeous purple and can be either really sheer or really intense depending on how you apply it.... which brings me to my FOTD!
It's a tad simple, so please bear with me!
roar... I should not have taken off the glasses.. but you can see it better this way (I usually wear glasses 24/7), my under-eye concealer has failed me in this picture HAHA *cries*
(DARN YOU UNEVEN LOOKING EYES! Please ignore the red eyes, I am allergic to everything in the air, I swear -____-.... I rely on eye drops 24/7 haha~)
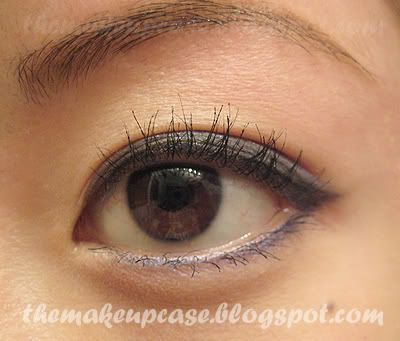
Eyes: Too Faced Shadow Insurance, Anna Sui Liquid Eye Color (201), MAC Paint Pot (Blackground), Maybelline Define-a-brow (Medium Brown), MAC Tempting Eyes Quad (Next to Nothing), Kiss Me Heroine Make Volume & Curl Mascara (Black), Clinique Lash Power Mascara (Black Onyx), Anastasia Brow Gel (Clear)
Face: MAC Select Moisturecover Concealer (NC20), Biotherm Forget It! Concealer (10), The Body Shop Lightening Touch (03), Physician's Formula Mineral Wear Talc-free Pressed Power (Translucent), Physician's Formula Multi-colored Powder Palette (Light Bronzer)
Lips: Biotherm Nutrisource Levres Lip Balm, Dior Addict High Shine Lipstick (624 Cranberry Croquette)
Quick Explanation of the Look
Face:
- Conceal spots/scars using MAC Select Moisturecover Concealer (NC20)
- Conceal undereyes with Biotherm Forget It! Concealer (10)
- Highlight around the eyes and on the bridge of your nose with The Body Shop Lightening Touch (03)
- Dust Physician's Formula Multi-colored Powder Palette (Light Bronzer) on the hollows on your cheeks and long your chin up to the forehead area
- Set everything with Physician's Formula Mineral Wear Talc-free Pressed Power (Translucent)
Eyes:
Firstttt!! Prime your eyes with Too Faced Shadow Insurance~
All Over the Lid & Inner Lower Lashline: MAC Tempting Eyes Quad (Next to Nothing)
Outer Corner & Outer Lower Lashline: Anna Sui Liquid Eye Color (201)
Liner: MAC Paint Pot (Blackground) using an smudge brush and smudge the liner
Brows: Maybelline Define-a-brow (Medium Brown), then set with Anastasia Brow Gel (Clear)
Lashes: First put on the Kiss Me Heroine Make Volume & Curl Mascara (Black) (mind you this isn't the same as the Kiss Me mascara that "tubes" your lashes, this is a drugstore brand from Japan that is totally different!) on the upper lashes, then put Clinique Lash Power Mascara (Black Onyx) on the lower lashes (this stuff NEVER smudges!! *loves*)
Lips:
- Put Biotherm Nutrisource Levres Lip Balm on to moisturize those chapped lips!!
- Leave it on for about 10 minutes so that it absorbs into your lips.
- Apply Dior Addict High Shine Lipstick (624 Cranberry Croquette)
and DONE~
Sorry I couldn't make an extremely detailed explanation!!
I took too long writing this, now I've gotten go prepare my presentation, memorize the presentation, and then practice for an interview examination T____T
Wish me luck!
Much <3
- Christina
Christina here! I found out my midterm was suddenly moved to ..... *DUN DUN DUN* FRIDAY!
Weeeeeeeeeeeeee... I can finally take somewhat of a break!! ANNNDD I can finally post my first FOTD =D
Yessss!
So today, I was really bored and whipped out my purple liquid eye shadow from Anna Sui..
It's a gorgeous purple and can be either really sheer or really intense depending on how you apply it.... which brings me to my FOTD!
It's a tad simple, so please bear with me!
roar... I should not have taken off the glasses.. but you can see it better this way (I usually wear glasses 24/7), my under-eye concealer has failed me in this picture HAHA *cries*
(DARN YOU UNEVEN LOOKING EYES! Please ignore the red eyes, I am allergic to everything in the air, I swear -____-.... I rely on eye drops 24/7 haha~)
Eyes: Too Faced Shadow Insurance, Anna Sui Liquid Eye Color (201), MAC Paint Pot (Blackground), Maybelline Define-a-brow (Medium Brown), MAC Tempting Eyes Quad (Next to Nothing), Kiss Me Heroine Make Volume & Curl Mascara (Black), Clinique Lash Power Mascara (Black Onyx), Anastasia Brow Gel (Clear)
Face: MAC Select Moisturecover Concealer (NC20), Biotherm Forget It! Concealer (10), The Body Shop Lightening Touch (03), Physician's Formula Mineral Wear Talc-free Pressed Power (Translucent), Physician's Formula Multi-colored Powder Palette (Light Bronzer)
Lips: Biotherm Nutrisource Levres Lip Balm, Dior Addict High Shine Lipstick (624 Cranberry Croquette)
Quick Explanation of the Look
Face:
- Conceal spots/scars using MAC Select Moisturecover Concealer (NC20)
- Conceal undereyes with Biotherm Forget It! Concealer (10)
- Highlight around the eyes and on the bridge of your nose with The Body Shop Lightening Touch (03)
- Dust Physician's Formula Multi-colored Powder Palette (Light Bronzer) on the hollows on your cheeks and long your chin up to the forehead area
- Set everything with Physician's Formula Mineral Wear Talc-free Pressed Power (Translucent)
Eyes:
Firstttt!! Prime your eyes with Too Faced Shadow Insurance~
All Over the Lid & Inner Lower Lashline: MAC Tempting Eyes Quad (Next to Nothing)
Outer Corner & Outer Lower Lashline: Anna Sui Liquid Eye Color (201)
Liner: MAC Paint Pot (Blackground) using an smudge brush and smudge the liner
Brows: Maybelline Define-a-brow (Medium Brown), then set with Anastasia Brow Gel (Clear)
Lashes: First put on the Kiss Me Heroine Make Volume & Curl Mascara (Black) (mind you this isn't the same as the Kiss Me mascara that "tubes" your lashes, this is a drugstore brand from Japan that is totally different!) on the upper lashes, then put Clinique Lash Power Mascara (Black Onyx) on the lower lashes (this stuff NEVER smudges!! *loves*)
Lips:
- Put Biotherm Nutrisource Levres Lip Balm on to moisturize those chapped lips!!
- Leave it on for about 10 minutes so that it absorbs into your lips.
- Apply Dior Addict High Shine Lipstick (624 Cranberry Croquette)
and DONE~
Sorry I couldn't make an extremely detailed explanation!!
I took too long writing this, now I've gotten go prepare my presentation, memorize the presentation, and then practice for an interview examination T____T
Wish me luck!
Much <3
- Christina
Friday, November 14, 2008
We're not dead!!!!!!!!!
Gahh!!
We're so sorry guys~
We haven't posted in sooooo long!
Brenda and I are in stressful midterm time! *cries* ...and they're so close to FINALS!
Finals are in a few weeks :( gah!
But please keep checking back!! If we get a break, we'll probably try to squeeze in a post!
Trust me, LOTS more posts to come :)
Thanks to everyone who's read/commented/followed so far!
We love you all~!!!
Stay beautiful everyone~
Much <3
- Christina
Wednesday, October 29, 2008
Dior Make Up Workshop!
Hello everyone!
Sorry for no update in a while, these few weeks are getting really horrible (midterms, presentations, in-class written exams, and essays!!! I think my head is going to explode..).
In midst of this tornado of school work, Brenda & I attended a Dior Make Up Workshop! And what a cool experience... I would recommend anyone who wants to learn about make up & skin care basics to definitely try to find one of these to go to (ask your closest MA about it!). Basically, Brenda was told by her MA at Dior about this make up class and I tagged along =P It was a class from 4pm - 6pm in the Bay upstairs in a private meeting room. I wasn't quite sure about a purchase or deposit for this class (we didn't pay a deposit for this one =/), but all we did was purchase one product each and we got a cool little gift (which included a little make up bag with Capture Totale eye cream, a small sample bottle of J'adore, and a small sample of Dior Addict gloss)!

When we entered the room, there was a whole bunch of tables to sit at with a bunch of Dior testers sitting there waiting for us to try them! Also, a few pages of face charts per each person to write down what was used. They also had some nice wraps, coffee, tea, water and COOKIES (YUM!), how sweet~!! We had to wait for a few late people so we did indulge a bit in those free snacks.. (Come on! How can one deny free food?!??!)... When we actually got started, the "teacher"(Dior Rep. for Canada) basically outlined that she was going to go through: the importance of skin care, an easy, natural, everyday make up look, make up on the go, and how to make your make up more dramatic (if needed/wanted). Also, at each table was a Dior MA to help out with choosing colors and make up application. The teacher was extremely nice and answered all our questions with much detail, I wasn't really fond of the MA at our make up table though (she ignored me for the most part... hopefully you guys get a much more helpful one than I did...). I'll outline each section of the workshop and the wonderful tips we picked up!
Skincare:
Some we already knew, some we didn't! So here are the tips!
Make Up:
That's all I remember for now...! No pictures right now T___T! We forgot our cameras!!! I must say, it was a pretty good result too. Be sure to look forward to our Halloween FOTD's though! They'll be coming up soon =D
Now, I must leave you guys! Brenda will continue this post with her P.O.V.! Hope you guys enjoyed these tips~
Much <3
- Christina
Hello darlings!
How has your week been as of current? Mine is more or less okay I suppose... anyways Christina has told you about the makeup workshop we went too, it was fun and interesting. Sadly though, I only really learned one or two things. Hmm I have long since turned my head from Dior makeup, mainly because of the price (I get products just as good if not better for less at MAC) but it they still do carry very nice high quality products. So I don't really have much to add onto Christina's post.
Tips from my previous addiction to Dior:
They're pretty basic but I first started makeup about a year and a half ago with Dior when a friend dragged me to a workshop and the MUA was the sweetest thing ever so I just stuck with it until I began getting into MAC about last winter. Off the top of my head this is all I can remember...
- When using Dior pencil liners or any eyeliners with wax in it go over it with a bit of black eyeshadow, this helps the eyeliner stay a bit longer because the when the wax melts it doesn't get all over your crease from blinking.
- Highlight the face and give the face a lift by using a highlighter colour from right above the apples of your cheeks to your forehead creating a C around your eye (C as in Christian Dior)
- If you're going to use your fingers, use your ring finger because it applies the least pressure (It's the weakest finger)
- If you're going to use Diorshow mascaras, layer them, they work better.
-Powder underneath the eye helps catch eyeshadow fallout and prevents mascara from smudging
- Make friends with your MA's you get little insider tips, heads-ups, and gifts.
That's all I have to share for today, I have some readings and and essay due Friday so I'm not quite sure if I'll get a post down by tomorrow but I want to start posting more often soon. I was going to do a Halloween FOTD but somehow I doubt that's going to happen.
-Blenda, like Splenda but sweeter!
Sorry for no update in a while, these few weeks are getting really horrible (midterms, presentations, in-class written exams, and essays!!! I think my head is going to explode..).
In midst of this tornado of school work, Brenda & I attended a Dior Make Up Workshop! And what a cool experience... I would recommend anyone who wants to learn about make up & skin care basics to definitely try to find one of these to go to (ask your closest MA about it!). Basically, Brenda was told by her MA at Dior about this make up class and I tagged along =P It was a class from 4pm - 6pm in the Bay upstairs in a private meeting room. I wasn't quite sure about a purchase or deposit for this class (we didn't pay a deposit for this one =/), but all we did was purchase one product each and we got a cool little gift (which included a little make up bag with Capture Totale eye cream, a small sample bottle of J'adore, and a small sample of Dior Addict gloss)!

When we entered the room, there was a whole bunch of tables to sit at with a bunch of Dior testers sitting there waiting for us to try them! Also, a few pages of face charts per each person to write down what was used. They also had some nice wraps, coffee, tea, water and COOKIES (YUM!), how sweet~!! We had to wait for a few late people so we did indulge a bit in those free snacks.. (Come on! How can one deny free food?!??!)... When we actually got started, the "teacher"(Dior Rep. for Canada) basically outlined that she was going to go through: the importance of skin care, an easy, natural, everyday make up look, make up on the go, and how to make your make up more dramatic (if needed/wanted). Also, at each table was a Dior MA to help out with choosing colors and make up application. The teacher was extremely nice and answered all our questions with much detail, I wasn't really fond of the MA at our make up table though (she ignored me for the most part... hopefully you guys get a much more helpful one than I did...). I'll outline each section of the workshop and the wonderful tips we picked up!
Skincare:
Some we already knew, some we didn't! So here are the tips!
- Always, always, ALWAYS wash your face with a good cleanser at the end of the day, even if you don't have make up on! Pollution and gunk from the air clog your pores during the day (ESPECIALLY if you live in the city, like us!!). For this demo, she used the Cleansing Gelee (which is good for oily/combo skin). For drier skin, the Cleansing Milk is suggested.
- Toner is your best friend! Toner is like the conditioner to your shampoo, it rebalances the skin and also removes anything you missed with your cleanser. Also, if you find yourself to have oily skin, instead of washing your face in the morning (making sure you absolutely did wash your face the night before!) just put on your toner then follow up as regular with your serum(optional), and moisturizer. All products used in this part were from the HydrAction line.
- When using serum or moisturizer, ONLY A PEA SIZED AMOUNT IS NEEDED (or one pump in terms of the serum or any other ones that contain pump packaging)! You just rub it between your finger tips and dab 3 spots: neck, cheeks, and your forehead. For the neck section, rub the moisturizer in a downwards motion. For the cheeks, you make 3 arcs (thing happy face smiles!) starting from the bottom of your face to the top of your cheeks. For your forehead, you just sweep the moisturizer in an upwards motion (like a fanning motion). If needed, dab a teeny bit on your nose (well she didn't mention this, but I find if you don't moisturize, it will only make your skin produce more oil later!!!).
- When using eye cream, only use a SMALL amount (half the size of a pea or less!) and don't put it directly under your eye. What you actually want to do is outline the area around your eye following the bone (like an oval shape) around the eye. If you put it directly on there, your eyes will just be more puffy! Again, this one was from the HydrAction line.
- HydrAction's Hydramask on your lips is wonderful for keeping your lips soft! It's so weird, but so true!! Just dab and rub some of the mask into your lips and they'll be super soft~!! You don't only have to use the Hydramask, it works with any hydrating mask (I tried it out with my Biotherm mask when I got home! MAKE SURE IT'S A HYDRATING MASK AND NOT A CLAY MASK OR ANYTHING). Of course, this isn't a replacement for your lip balm, but it's a nice treatment! I like putting the mask on my lips and then shoving lip balm on my lips for ultimate hydration; it works like a dream and makes my lips ultra smooth for lipgloss/lipstick application.
Make Up:
- Less is more. Use only one pump of foundation (or a dime size amount) on the ENTIRE face and apply sparingly! If you apply it sheerly, you can go back and apply more in the areas you need a bit more help (ie. blemish spots, etc.) and also put concealer on areas that need EXTRA help (it helps because you end up using less concealer too!!). Apply starting on the left cheek with a foundation brush or sponge and blend outwards and repeat with other parts of the face. After, do the same with the other side but pause to admire the amazing difference foundation makes~! I ended up using Airflash spray on foundation in shade 200. With this one, I had Brenda spray a bit on my face and then I sprayed some on the back of my hand and went back to apply to any places I needed.
- The perfect place to apply blush is 2 fingers away from your nose and 2 fingers away under your lower lash line. Apply in minimality, and anything extra can be used on the outer corners of your eyes to give them a bit of a nice glow. Cream blush is awesome for this, but powder works just as well too!! We used the Pro Cheeks blush in 545.
- Tightlining your eyes can give your eyes more depth and make your lashes look like they are going for miles~! Don't know how to tightline? All you do is take a black pencil eye liner and line the part right under your upper lash line! It's the part right between your lashes and your eyeball! This one might take some practice and, yes, you will most likely tear from doing this, but with lots of practice it will be easy and gives your eyes a wonderful look! Make sure to use a waterproof forumla as well! We used the Waterproof Crayon Liner in Black.
- Iconic is great as a base for your mascara. Since the Iconic is meant for curl and separation, it makes a great base to put on another mascara of choice! I used Blackout on top of the iconic and it looked awesome~! It's great for people who want to add more drama to their lashes.
That's all I remember for now...! No pictures right now T___T! We forgot our cameras!!! I must say, it was a pretty good result too. Be sure to look forward to our Halloween FOTD's though! They'll be coming up soon =D
Now, I must leave you guys! Brenda will continue this post with her P.O.V.! Hope you guys enjoyed these tips~
Much <3
- Christina
Hello darlings!
How has your week been as of current? Mine is more or less okay I suppose... anyways Christina has told you about the makeup workshop we went too, it was fun and interesting. Sadly though, I only really learned one or two things. Hmm I have long since turned my head from Dior makeup, mainly because of the price (I get products just as good if not better for less at MAC) but it they still do carry very nice high quality products. So I don't really have much to add onto Christina's post.
Tips from my previous addiction to Dior:
They're pretty basic but I first started makeup about a year and a half ago with Dior when a friend dragged me to a workshop and the MUA was the sweetest thing ever so I just stuck with it until I began getting into MAC about last winter. Off the top of my head this is all I can remember...
- When using Dior pencil liners or any eyeliners with wax in it go over it with a bit of black eyeshadow, this helps the eyeliner stay a bit longer because the when the wax melts it doesn't get all over your crease from blinking.
- Highlight the face and give the face a lift by using a highlighter colour from right above the apples of your cheeks to your forehead creating a C around your eye (C as in Christian Dior)
- If you're going to use your fingers, use your ring finger because it applies the least pressure (It's the weakest finger)
- If you're going to use Diorshow mascaras, layer them, they work better.
-Powder underneath the eye helps catch eyeshadow fallout and prevents mascara from smudging
- Make friends with your MA's you get little insider tips, heads-ups, and gifts.
That's all I have to share for today, I have some readings and and essay due Friday so I'm not quite sure if I'll get a post down by tomorrow but I want to start posting more often soon. I was going to do a Halloween FOTD but somehow I doubt that's going to happen.
-Blenda, like Splenda but sweeter!
Friday, October 24, 2008
RED RED RED!
Red is a classic colour, one that will always be the showstopper. Some of us will spend countless hours at the makeup counters looking for that perfect red lip colour, now I have many reds and the "perfect" red has yet to be found (well actually I have found it in the YSL heart necklace from last years holiday collection but it's in a palette and I want that colour by the tubes, TUBES I SAY!) but I'm getting closer, I can feeellll it.

I really REALLY need a new camera none of these look like they do in real life. Here are a few reds from different brands, I compared 15 red lip colours on my hand from high end to MAC because I don't believe in drugstore brands. For the high ends there was usually a dupe that was almost exact, goes to show you that high price doesn't always mean better.
Chanel Shanghai Red $30.00 CAD - My suggestion is to get MAC's Dubonet ($16.50 CAD), which is a SLIGHT bit more red but honestly it is only noticeable if you're picking it apart like I am. This is one of Chanel's best selling colours just like Dubonet is one of MAC's best selling amplified cremes... I think there is a connection! Another colour from Chanel that is really similar to this one is Lotus Rouge which is a bit darker and more dramatic if that's what you prefer. MAC's So Scarlet($16.50 CAD) and Rapturous mattene ($17.50 CAD) from the Cult of Cherry collection are also quite similar however they were limited (I believe Rapturous is still available on the MAC website)
Estee Lauder in Rich Red $32.00 CAD - More expensive then Chanel? Yes it's ridiculous to me but it is the first red lipstick I ever bought and it is a decent colour. This one is a bit more orange then all my other lipsticks, which I am not a fan of since I tend to go for blue based but overall it's a decent colour. Worth the $32.00 CAD however? No... not really.
Dior Addict High Shine in Runway Red $31.00 CAD - I don't consider this a red, just like I don't consider MAC's Adore it a red (In the new Adoring Carmine Red Lips set $42.00 CAD). So sheer it's a sheer pink. They're pretty much the same except the Dior packaging makes me feel like going around pulling out the lipstick pretending it's a light saber.
MAC in Russian Red $16.50 CAD - If you love Russian Red, I suggest checking "Red" she said out from MAC's holiday collection, to me when on the lips ("Red" she said is a little more pink when swatched and a slight bit darker) it is basically the same colour. However, I hate wearing mattes because by 3 pm I feel like my lips are so dry they're going to fall off but "Red" she said is an amplified *YAY* so it's a much more hydrating lipstick. Go check that lipstick out....STAT!
Dior Creme de Gloss in Rouge nectar $31.00 CAD - Shines like a gloss, looks like melted lipstick, and is hydrating! I love this colour it is the closest one to my YSL palette red and is just gorgeous, if you're not used to wearing lipsticks and prefer glosses I definitely suggest this because it's an amazing dramatic colour with all the benefits of a gloss! The price is a bit steep though so another option would probably be MAC Russian Red lipglass ($16.50 CAD) with a but of Desire Lipglass ($16.50 CAD).
MAC in New York Apple ($16.50 CAD) This is too pink for me to call a red (IMO) so I was very disappointed because I heard it was a good dupe of Queen's sin from last years MAC holiday which I missed *Cries* personally it is almost an exact dupe of Adore it from the red lip set this holiday. Nothing more about this colour, it's just not a red red that's all.
Dior addict gloss in red stockings ($31.00 CAD) - Sort of looks like Russian red($16.50 CAD) or Cult of Cherry(No longer available) lipglasses by MAC, it's a nice sheer hot pink when it fades though but personally I prefer lipglasses. Dior is nice but it doesn't have staying power...at all.
MAC viva glam 1 ($16.50 CAD) - Pretty classic matte red for a good cause, what more could a girl want?! If you're in a fork in the road in your red search and haven't tried this one and Russian red you should definitely take a peek =)
Future plans on getting - MAC's :Lady Danger, Ruby Woo, Brave Red, Fresh Moroccan, MAC red, Chili, Lady Bug. Estee Lauders: Ruby, Dior: Red Premier
What about you, what is your "perfect" red if you've found it? Any red you want to try?
Wednesday, October 22, 2008
Birthday FOTD!
Yay! It's the first face of the day! Okay so I'm really sorry about me not posting and the lack of posts in general these pasts few weeks have been brutal but like it says in the profile we're busy people with assignments and tests up to our noses! So here is my really easy but dramatic birthday FOTD, that's right, my birthday.
(I used flash since in my room it is impossible not to so you can't see the blush and all the colours have been lightened...including my face.)

Eyes: Urban Decay Primer potion, Dior Earth Tones Palette LE *, MAC powerpoint E/L in Engraved, Lancome Cils XL booster, Diorshow Iconic
Face: MAC Pinch me blush (Though you can't see it >=( !)
Lips: MAC prep+prime lips, Benefit D'liner D'finer, Chanel Fantastic Plum L/S*
Possible substitutions for this look:
* Dior Earth Tones Palette = MAC colour forms palette LE, L'Oreal Wear Infinite E/S Quad in Landscape, MAC Humid E/S, MAC Artifact P/P, MAC Bamboo E/S
*Chanel Fantastic Plum L/S= MAC New York Apple L/S, MAC Plumful L/S, MAC Kirsh Mattene LE
Finish foundation, concealer, and setting powder and use brow gel to set the brows. Use UDPP on the lid and lightly on the brow bone, use dark khaki colour on lid using MAC 239 then apply dark rusty red colour on and slightly above crease using the same brush. Using MAC 252 apply highlight colour above crease and to brow bone, then use MAC 217 to blend DOWNWARDS from the highlight colour to the red then blend UPWARDS from the khaki colour to the red. Apply black pencil eyeliner on upper lid, mascara base, mascara, and blush (Apply kohl eyepencil to waterline if desired). Apply MAC prep + prime lips, line lips with lip liner, apply lipstick, put on a pair of smokin' stiletto's and look fabulous.

Now this isn't it because I know there are a few other things (Such as my MAC Manish eye palette) The boy says I'm like a child >_> but hey, I love makeup! The ones on the top are from my mom and dad, left hand side is from my hunny (Which we've seen), and right hand side is from Christina (<3).
My present to myself will be the Guerlain Midnight Butterfly Sublime Radiance Powder if someone else doesn't get it for me (Mainly the person I'm shopping with Saturday).

(All MAC : Rose + Red lips sets, Viva Glam cool Lips palette, Girl About Town L/S, Prep+Prime lips, Cool Heat LE E/S, Juxt E/S, Satellite Dreams E/S, Newly Minted E/S, Shimmer Moss E/S, Electra E/S)
I can't wait til Saturday I go shopping for more of my presents! YAY!
Anyways how has everyone been? Good I hope, stay tuned I'll definitely try to update more often and throw in more FOTD's it's just a little rough right now so maybe after next week (I have 4 papers due X_X) but I'll try to post this weekend. I hope you enjoy the rest of your week... OMG it's Thursday! YESSSS!!!
-Person with Thursdays off.
Saturday, October 18, 2008
Gel Liners vs. Cream Liners
Hello everyone!
Long time no post for me! I apologize.. Last week few weeks I have a whole bunch of quizzes/midterms and still have a whole bunch to do -_-;; So very stressful...
Anyways, I thought I would do a quick post on some gel & cream liners~ (woo.. so many eye liner topics!! I will remind myself to switch it up in the next post!)
Anyways, here is some info on gel & cream liners and their differences. Enjoy~
I've always had problems with liquid and pencil eye liners.. so one day I decided to try gel liners and man... was it amazing!!
I will be reviewing liners from 4 different brands (2 gel, 2 cream; excuse me if any prices are wrong! My memory of them has left me...).
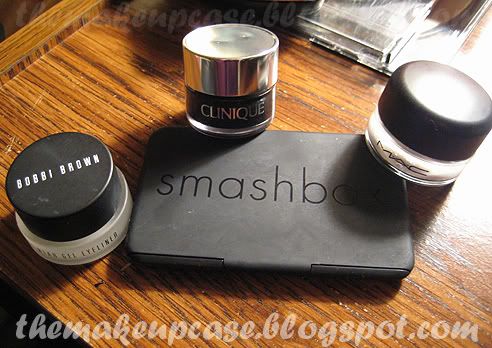
All colors are black =) I needed to keep it consistent!
The blacks look a bit shiny.. but I think that was due to the lights! Sorry about that guys, my room isn't the best place in the world to make pictures >_<~
THESE ARE NOT MEANT TO BE ON THE WATER LINE! They do not stay very well on there, and MAC specifically states that it is not safe used on the waterline (and I'd imagine others aren't either)!!!
So, both these liners are mean to be very intensely colored and are more dense than liquid liners. Also, they are supposed to have better saying power than that of liquid & pencil. For people who have problems with either of those 2 liners, I'd recommend giving these a try. They usually come in a pot which means these liners are meant to be used with an eye liner brush. I'll give some recommendations & tell you the different types of liner brushes.
Gel Liner: Gel-based eye liner. Creates a nice, clean line. Can be smudged for a smokey look but IMO, it doesn't work too well for smudging and smoking out for a smokey eye look.
Cream Liner: Cream-based eye liner. These ones are meant to be smudged for the smokey eye look. They are really creamy and go on a bit better than gel liners, but they are more prone to smudge under my eye and make me look like a raccoon!!
Gel Liners!
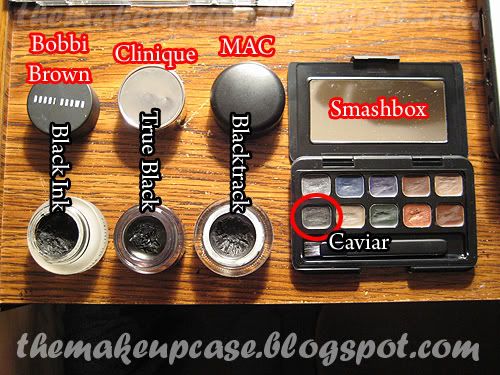
Bobbi Brown Long Wear Gel Liner - 1 Black Ink: The famous gel liner! Bobbi Brown is famous for this and I must say, this is wonderful stuff!! It's a bit more pricey, but the staying power and color are wonderful!! It doesn't give me raccoon eyes and it really is a true, rich black (instead of a dark gray, which I find to be a common outcome with a lot of black liners..). I get a perfect line every time with this stuff :) It is certainly one of my HG's. I haven't been able to use liquid or pencil liners very often after I tried this stuff. I own this in Mahogany Ink (Deep Brown) and, of course, Black Ink. I love them both~! The formula is a bit thicker/harder than other gel liners, but you still only need a teeny bit to create one full line! I think Black Ink is pretty intense, so I tend to wear the Mahogany Ink for more of an everyday look. You can find these at Holt Renfrew in Canada. I'd recommend this for people with oily lids and have trouble with eye liner smudging under their eyes!!
Price: $25 CAD
Staying Power: 5
Color Intensity(Black): 5
Color Variety: 4
There are a mlots for this liner but yet nothing that screams "different"! If you want something with color variety that is more bold/striking, this isn't the best choice. They have the standard black, many, many shades of brown and a few different colors (Violet, Indigo, Ivy Shimmer).
MAC Fluidline - Blacktrack: This is also a famous product from MAC. It is said to rival that of Bobbi Brown but IMO Bobbi Brown prevails! This texture of this is much smoother than Bobbi Brown's but, unfortunately, it smudges on me like crazy!!! It gives a smooth, rich black line that looks wonderful and perfect.. but after a few hours, I looked like a giant raccoon!! If I use primer, it's a BIT better but still smudges a bit..
Price: $18 CAD
Staying Power: 3.5
Color Intensity(Black): 5
Color Variety: 4
Lots of bold colors for this one! I absolutely loveeeeeeee Blue Peep~ it's so different, but I guess they don't sell it anymore??!! (It's not on the website!!!) Best make a trip down to a MAC counter or freestanding store to ask about it.. Honestly, it's such a wonderful color!! Macroviolet is also a really beautiful deep purple that I'd recommend.
Cream Liners!
Clinique - 02 True Black: This one comes with it's own brush!!! It's a tiny little brush that is really adorable, unfornately I didn't have a use for it since I love my MAC 263 brush. If you were looking for a one that is a reasonable price and also eliminates the factor of finding a brush, this is definitely worth a try! It really is a "true" black. It's very intense and the consistensy of this is amazingly smooth. Unfortunately, this one smudged on me too :( You get about the same results as the MAC fluidline~ I only own the True Black as of now..
Price: $16 CAD
Staying Power: 3.5
Color Intensity(Black): 5
Color Variety: 2
There's only 4 colors for this one.. True Black, Deep Brown, Smoke Grey, and Black Honey (a deep brown with a hint of reddish undertone). I'd recommend the Black Honey for anyone with a warm complexion, it looks beautiful~
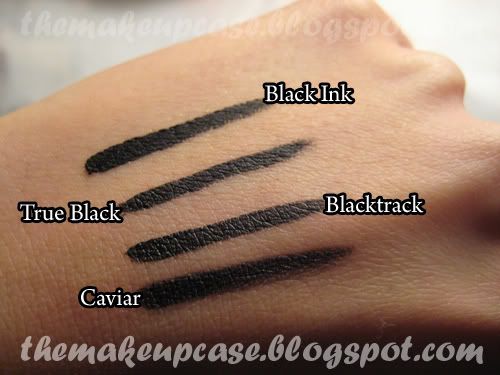
Smashbox Cream Eye Liner - Caviar: This was my least favourite of all.. you need to get on A LOT of product for this to come out a true black.. in the picture, it took me two layers to get it to match the black of the other three liners and yet it STILL wasn't as black as the others! It smudges really easily.. but it's not completely horrible. I own the palette of cream liners because I wanted to give all the colors a try and, man, was this a horrible purchase. Of all 10 colors, I only really like 2 of them.... I would never recommend this one unless they were looking for a color other than black.
Price: $27 CAD
Staying Power: 3
Color Intensity(Black): 3
Color Variety: 4
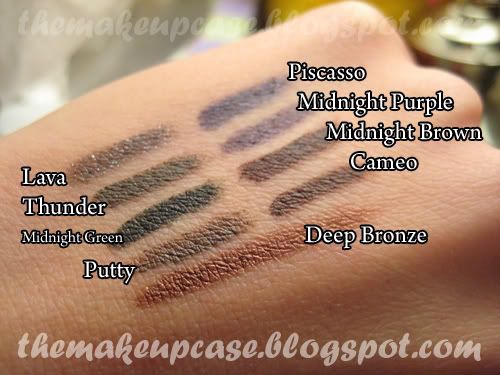
This one has a WIDE variety of shades, but nothing is too intense. Lots of colours but they are all pretty subdued. Picasso(Midnight Blue), Midnight Purple, and Midnight Green really disappointed me... I was hoping for more color in them but was left unsatisfied. The Picaso (even with 2 layers!) still didn't strong and same with the Midnight Purple! Maybe if you shined an extremely bright light on them, I don't think you would even see the colours. Midnight green looked like a weird dark green-gray that looked almost black.. so disappointing -___-;
Here is a picture of the other colors in the Cream Eye Liner Palette (my favourites are Lava(Shimmery silver; great for smokey eyed looks) and Deep Bronze (beautiful shimmery bronze)):
Now... You're probaby wondering what kind of brush to use with these! You have a very good selection. I'll be using MAC & Bobbi Brown brushes as examples (but of course they aren't the only ones that have these kinds of brushes! Look around! You can find many such as Sephora, Quo (in Canada), Urban Decay, Benefit, etc. (Images taken from MAC & Bobbi Brown websites)

MAC 266
1) Angeled Eye liner Brush: My favourite of all to apply eyeliner! It is absolutely one of the easiest brushes to use! I recommend this one to beginners because it's so fool-proof and accurate! What you would be looking for a brush with stiff, short, angled top. My favourite is the 263 brush from MAC! It always gives me a perfect line and I can really get in between the little spaces in my lashes for a perfectly lined look. Another great one is MAC's 266 brush (which is slightly bigger than the 263).

MAC 209
2) Standard Eye liner Brush: Basically this brush looks like the brushes that are included in your bottle of liquid liner. If you are used to those, this one would be an easy one to switch into! It's also very easy to use even for beginners and would be my next recommendation next to the angled liner brush. I own the MAC 209 and use it regularly with gel/cream liners and also cake liners wet (which I only have one... haha). They usually come a bit thicker (MAC 209) and also very thin for ultimate precision (MAC 210).

MAC 212
3) Flat Definer Brush: This one is definitely my least favourite.. I wouldn't recommend these to beginners. Basically how you use these is to "push" the liner on. I've never found myself getting a good line with this. It's only good for shoving on some liner and smudging when doing a smokey eye.. otherwise I wouldn't use it. I own the MAC 212 and it's rarely use it...

Bobbi Brown Eye Liner Brush
4) Rounded Eye liner brush: The famous gel liner also comes with the famous liner brush. This one comes in the regular side and an ultra fine version for ultimate precision. This one is also extremely easy to use! They're about on the same level of easiness as the angled liner brush. I would also recommend this! Unfortunately, I still prefer my angled one since I find it a lot easier to do a wing with the angle.. This one is still a GREAT brush though! I have the Ultra Fine Eye Liner Brush from Quo and it works awesome (I'd still like to grab the Bobbi Brown Ultra Fine Eye Liner Brush one day.. Yumm~ I love BB). I don't use it as often but it is a wonderful, fool-proof brush as well :)
Well~ That's all I have to say for today!! I hope some people will try out some of these Gel/Cream liners because they are very awesome and easy to use~
I hope you enjoyed this review and please leave comments!!!
Have a good night everyone~
-Much <3
Christina
Long time no post for me! I apologize.. Last week few weeks I have a whole bunch of quizzes/midterms and still have a whole bunch to do -_-;; So very stressful...
Anyways, I thought I would do a quick post on some gel & cream liners~ (woo.. so many eye liner topics!! I will remind myself to switch it up in the next post!)
Anyways, here is some info on gel & cream liners and their differences. Enjoy~
I've always had problems with liquid and pencil eye liners.. so one day I decided to try gel liners and man... was it amazing!!
I will be reviewing liners from 4 different brands (2 gel, 2 cream; excuse me if any prices are wrong! My memory of them has left me...).
All colors are black =) I needed to keep it consistent!
The blacks look a bit shiny.. but I think that was due to the lights! Sorry about that guys, my room isn't the best place in the world to make pictures >_<~
THESE ARE NOT MEANT TO BE ON THE WATER LINE! They do not stay very well on there, and MAC specifically states that it is not safe used on the waterline (and I'd imagine others aren't either)!!!
So, both these liners are mean to be very intensely colored and are more dense than liquid liners. Also, they are supposed to have better saying power than that of liquid & pencil. For people who have problems with either of those 2 liners, I'd recommend giving these a try. They usually come in a pot which means these liners are meant to be used with an eye liner brush. I'll give some recommendations & tell you the different types of liner brushes.
Gel Liner: Gel-based eye liner. Creates a nice, clean line. Can be smudged for a smokey look but IMO, it doesn't work too well for smudging and smoking out for a smokey eye look.
Cream Liner: Cream-based eye liner. These ones are meant to be smudged for the smokey eye look. They are really creamy and go on a bit better than gel liners, but they are more prone to smudge under my eye and make me look like a raccoon!!
Gel Liners!
Bobbi Brown Long Wear Gel Liner - 1 Black Ink: The famous gel liner! Bobbi Brown is famous for this and I must say, this is wonderful stuff!! It's a bit more pricey, but the staying power and color are wonderful!! It doesn't give me raccoon eyes and it really is a true, rich black (instead of a dark gray, which I find to be a common outcome with a lot of black liners..). I get a perfect line every time with this stuff :) It is certainly one of my HG's. I haven't been able to use liquid or pencil liners very often after I tried this stuff. I own this in Mahogany Ink (Deep Brown) and, of course, Black Ink. I love them both~! The formula is a bit thicker/harder than other gel liners, but you still only need a teeny bit to create one full line! I think Black Ink is pretty intense, so I tend to wear the Mahogany Ink for more of an everyday look. You can find these at Holt Renfrew in Canada. I'd recommend this for people with oily lids and have trouble with eye liner smudging under their eyes!!
Price: $25 CAD
Staying Power: 5
Color Intensity(Black): 5
Color Variety: 4
There are a mlots for this liner but yet nothing that screams "different"! If you want something with color variety that is more bold/striking, this isn't the best choice. They have the standard black, many, many shades of brown and a few different colors (Violet, Indigo, Ivy Shimmer).
MAC Fluidline - Blacktrack: This is also a famous product from MAC. It is said to rival that of Bobbi Brown but IMO Bobbi Brown prevails! This texture of this is much smoother than Bobbi Brown's but, unfortunately, it smudges on me like crazy!!! It gives a smooth, rich black line that looks wonderful and perfect.. but after a few hours, I looked like a giant raccoon!! If I use primer, it's a BIT better but still smudges a bit..
Price: $18 CAD
Staying Power: 3.5
Color Intensity(Black): 5
Color Variety: 4
Lots of bold colors for this one! I absolutely loveeeeeeee Blue Peep~ it's so different, but I guess they don't sell it anymore??!! (It's not on the website!!!) Best make a trip down to a MAC counter or freestanding store to ask about it.. Honestly, it's such a wonderful color!! Macroviolet is also a really beautiful deep purple that I'd recommend.
Cream Liners!
Clinique - 02 True Black: This one comes with it's own brush!!! It's a tiny little brush that is really adorable, unfornately I didn't have a use for it since I love my MAC 263 brush. If you were looking for a one that is a reasonable price and also eliminates the factor of finding a brush, this is definitely worth a try! It really is a "true" black. It's very intense and the consistensy of this is amazingly smooth. Unfortunately, this one smudged on me too :( You get about the same results as the MAC fluidline~ I only own the True Black as of now..
Price: $16 CAD
Staying Power: 3.5
Color Intensity(Black): 5
Color Variety: 2
There's only 4 colors for this one.. True Black, Deep Brown, Smoke Grey, and Black Honey (a deep brown with a hint of reddish undertone). I'd recommend the Black Honey for anyone with a warm complexion, it looks beautiful~
Smashbox Cream Eye Liner - Caviar: This was my least favourite of all.. you need to get on A LOT of product for this to come out a true black.. in the picture, it took me two layers to get it to match the black of the other three liners and yet it STILL wasn't as black as the others! It smudges really easily.. but it's not completely horrible. I own the palette of cream liners because I wanted to give all the colors a try and, man, was this a horrible purchase. Of all 10 colors, I only really like 2 of them.... I would never recommend this one unless they were looking for a color other than black.
Price: $27 CAD
Staying Power: 3
Color Intensity(Black): 3
Color Variety: 4
This one has a WIDE variety of shades, but nothing is too intense. Lots of colours but they are all pretty subdued. Picasso(Midnight Blue), Midnight Purple, and Midnight Green really disappointed me... I was hoping for more color in them but was left unsatisfied. The Picaso (even with 2 layers!) still didn't strong and same with the Midnight Purple! Maybe if you shined an extremely bright light on them, I don't think you would even see the colours. Midnight green looked like a weird dark green-gray that looked almost black.. so disappointing -___-;
Here is a picture of the other colors in the Cream Eye Liner Palette (my favourites are Lava(Shimmery silver; great for smokey eyed looks) and Deep Bronze (beautiful shimmery bronze)):
Now... You're probaby wondering what kind of brush to use with these! You have a very good selection. I'll be using MAC & Bobbi Brown brushes as examples (but of course they aren't the only ones that have these kinds of brushes! Look around! You can find many such as Sephora, Quo (in Canada), Urban Decay, Benefit, etc. (Images taken from MAC & Bobbi Brown websites)
MAC 266
1) Angeled Eye liner Brush: My favourite of all to apply eyeliner! It is absolutely one of the easiest brushes to use! I recommend this one to beginners because it's so fool-proof and accurate! What you would be looking for a brush with stiff, short, angled top. My favourite is the 263 brush from MAC! It always gives me a perfect line and I can really get in between the little spaces in my lashes for a perfectly lined look. Another great one is MAC's 266 brush (which is slightly bigger than the 263).
MAC 209
2) Standard Eye liner Brush: Basically this brush looks like the brushes that are included in your bottle of liquid liner. If you are used to those, this one would be an easy one to switch into! It's also very easy to use even for beginners and would be my next recommendation next to the angled liner brush. I own the MAC 209 and use it regularly with gel/cream liners and also cake liners wet (which I only have one... haha). They usually come a bit thicker (MAC 209) and also very thin for ultimate precision (MAC 210).
MAC 212
3) Flat Definer Brush: This one is definitely my least favourite.. I wouldn't recommend these to beginners. Basically how you use these is to "push" the liner on. I've never found myself getting a good line with this. It's only good for shoving on some liner and smudging when doing a smokey eye.. otherwise I wouldn't use it. I own the MAC 212 and it's rarely use it...
Bobbi Brown Eye Liner Brush
4) Rounded Eye liner brush: The famous gel liner also comes with the famous liner brush. This one comes in the regular side and an ultra fine version for ultimate precision. This one is also extremely easy to use! They're about on the same level of easiness as the angled liner brush. I would also recommend this! Unfortunately, I still prefer my angled one since I find it a lot easier to do a wing with the angle.. This one is still a GREAT brush though! I have the Ultra Fine Eye Liner Brush from Quo and it works awesome (I'd still like to grab the Bobbi Brown Ultra Fine Eye Liner Brush one day.. Yumm~ I love BB). I don't use it as often but it is a wonderful, fool-proof brush as well :)
Well~ That's all I have to say for today!! I hope some people will try out some of these Gel/Cream liners because they are very awesome and easy to use~
I hope you enjoyed this review and please leave comments!!!
Have a good night everyone~
-Much <3
Christina
Sunday, October 12, 2008
Makeup brushes!
Now any good make-up addict should have a brush set, why? Don't ask, never question the brush set. Not only do they tug less on your skin then your fingers but they also help create amazing looks and who doesn't love looking amazing? But if you don't already own a brush set, or are in need of a new set then this holiday is the best time to start buying m'dears! It seems as though a lot of brands are making adorable brush sets this holiday! So here are just a few brush sets from different brands to help you decide.

(Image from Sephora.com)
The Makeup Artist Brush Belt
Now who doesn't love pulling a brush from a belt and feeling like a total super hero ready to make someone feel totally smokin' (Or even themselves!) ? I know I'd love that feeling, sadly the price is a little heavy for me at the moment (Darn the economy) and I lack a credit card (For good reason!). There is one without brushes in there for cheaper so if you have the brushes already then the belt would be nice to keep everything in order. However Sephora brand brushes are pretty good quality and this would be a sweet investment, total must have for a make-up artist wanna-be like me. Hey that rhymed!

(Image from Temptalia.com)(Limited Edition)
Though I can't find the link for this particular item it will probably be available at Nordstrom, The Bay, and Holt Renfrew. Most likely Holt Renfrew for us Canadians, eh. Dior normally has a brush set I believe, full sized too however it's a hundred something for like four brushes if I remember correctly. If luxury is your thang however this is totally the set for you. I personally like Dior brushes they are really good quality, but the fact that it's real mink fur just makes me uncomfortable using it.


(Images from Temptalia.com)
Lancome travel brush sets ($55.00 USD ea.)(Limited Edition)
Personally I'm not a fan of these, mainly because they look like MAC sets, except MAC looks nicer and are cheaper. Lancome brushes aren't my favorite but it looks as though they stepped up their game for these brushes, however it could just be photoshop.

(Image from MACcosmetics.com)
Adoring Carmine Brush Sets (In stores Oct 16th)(Limited edition)
Like last years Heirlooms and earlier this years Color forums MAC has come out with another brush set (As if we didn't see it coming). I love these brush sets, cute packaging and in my favorite colour! Sadly I bought all the sets last year and buying this one would be a little, well useless. This would be a nice little gift for anyone you know who is just getting into makeup, or perhaps you want a nice little set to travel with, maybe this will even be your main brush set but whatever the reason these sets are definitely a steal!

(Image from Sephora.com)
Too Faced Teddy Bear Hair brush set
Cruelty-free brush set that is oooohhhh sooo soft! But I'm going to cut this post a little short because this post is getting much longer then initially planned.

(Image from Urban Decay)
Big (Or little) Buddha brush set
Cruelty-free, soft, cool packaging.
Okay so I was going to post more but honestly, this post is long enough as it is and it's getting late and I still haven't started on my paper (The boy also looks tired so I want to turn the lights off). So if you're interested here are the links to the other sites:
The Body Shop
Quo (From Shoppers Drug Mart)
Shu Uemura
Juicy Couture (Limited Edition)
Kat Von D
Brush sets at Sephora (It's getting too late, so taking the lazy way out.)
-Sleepy and lazy Brenda
(Image from Sephora.com)
The Makeup Artist Brush Belt
Now who doesn't love pulling a brush from a belt and feeling like a total super hero ready to make someone feel totally smokin' (Or even themselves!) ? I know I'd love that feeling, sadly the price is a little heavy for me at the moment (Darn the economy) and I lack a credit card (For good reason!). There is one without brushes in there for cheaper so if you have the brushes already then the belt would be nice to keep everything in order. However Sephora brand brushes are pretty good quality and this would be a sweet investment, total must have for a make-up artist wanna-be like me. Hey that rhymed!
(Image from Temptalia.com)(Limited Edition)
Though I can't find the link for this particular item it will probably be available at Nordstrom, The Bay, and Holt Renfrew. Most likely Holt Renfrew for us Canadians, eh. Dior normally has a brush set I believe, full sized too however it's a hundred something for like four brushes if I remember correctly. If luxury is your thang however this is totally the set for you. I personally like Dior brushes they are really good quality, but the fact that it's real mink fur just makes me uncomfortable using it.
(Images from Temptalia.com)
Lancome travel brush sets ($55.00 USD ea.)(Limited Edition)
Personally I'm not a fan of these, mainly because they look like MAC sets, except MAC looks nicer and are cheaper. Lancome brushes aren't my favorite but it looks as though they stepped up their game for these brushes, however it could just be photoshop.

(Image from MACcosmetics.com)
Adoring Carmine Brush Sets (In stores Oct 16th)(Limited edition)
Like last years Heirlooms and earlier this years Color forums MAC has come out with another brush set (As if we didn't see it coming). I love these brush sets, cute packaging and in my favorite colour! Sadly I bought all the sets last year and buying this one would be a little, well useless. This would be a nice little gift for anyone you know who is just getting into makeup, or perhaps you want a nice little set to travel with, maybe this will even be your main brush set but whatever the reason these sets are definitely a steal!
(Image from Sephora.com)
Too Faced Teddy Bear Hair brush set
Cruelty-free brush set that is oooohhhh sooo soft! But I'm going to cut this post a little short because this post is getting much longer then initially planned.
(Image from Urban Decay)
Big (Or little) Buddha brush set
Cruelty-free, soft, cool packaging.
Okay so I was going to post more but honestly, this post is long enough as it is and it's getting late and I still haven't started on my paper (The boy also looks tired so I want to turn the lights off). So if you're interested here are the links to the other sites:
The Body Shop
Quo (From Shoppers Drug Mart)
Shu Uemura
Juicy Couture (Limited Edition)
Kat Von D
Brush sets at Sephora (It's getting too late, so taking the lazy way out.)
-Sleepy and lazy Brenda
Subscribe to:
Posts (Atom)